 押さえておきたいWeb知識
 - English
- 日本語
 サーバーの立て方を教えている人
「Xserver VPS」を利用したMisskeyサーバーの立て方を知りたいという方はいませんか?
そこでこの記事では「Xserver VPS」を利用したMisskeyサーバーの立て方について詳しく解説していきたいと思います。
気になる方は是非最後まで読んで頂けたら幸いです。
\XserverならMisskeyテンプレート提供/
【2025年7月10日まで】利用料金30%をキャッシュバック!初期費用無料!月額580円から使える!
目次
Xserver VPSとは!?
\XserverならMisskeyテンプレート提供/
【2025年7月10日まで】利用料金30%をキャッシュバック!初期費用無料!月額580円から使える!
- 国内シェアNo.1レンタルサーバー「エックスサーバー」が満を持して送るVPSサービス
- 圧倒的ハイコストパフォーマンス
- CPUもストレージも圧倒的ハイスペック
- 快適なネットワーク環境
- Minecraftなどのゲームがマルチプレイですぐに楽しめる
「Xserver VPS」は国内シェアNo.1レンタルサーバー「エックスサーバー」が満を持して送るVPSサービスです。
19年以上積み重ねた豊富なサーバー運用実績と安定したサーバー環境を提供する確かな技術力を元に、最高品質のサービスを提供し続けています。
月額470円でvCPU3コア、メモリ2GBといったハイスペックなサーバーが使える国内最安クラスのハイコストパフォーマンスを実現しています。
仮想専用サーバーであるためレンタルサーバーと比較して他のユーザーの影響を受けにくくなります。
Xserver VPSでは「OSイメージ」や「アプリイメージ」が多数用意されています。
サービスに合わせたイメージを選択することで、サーバー作成と同時にOSのインストールやアプリケーションサーバーの構築が完了します。
Minecraftのマルチサーバーや、ブログ・Webサイトの制作環境、開発用のLAMP環境なども簡単に立ち上げることが可能です。
少しでも気になるという方は是非「Xserver VPS」を利用してみてはいかがでしょうか?
\XserverならMisskeyテンプレート提供/
【2025年7月10日まで】利用料金30%をキャッシュバック!初期費用無料!月額580円から使える!
Xserver VPSを利用したMisskeyサーバーの立て方
サーバーの立て方を教えている人
「Xserver VPS」を利用したMisskeyサーバーの立て方をみていきましょう。
\XserverならMisskeyテンプレート提供/
【2025年7月10日まで】利用料金30%をキャッシュバック!初期費用無料!月額580円から使える!
Misskeyアプリイメージインストール手順
Xserverアカウントへログインし、「追加申し込み」をクリックしてください。

「イメージタイプ」における「アプリケーション」タブより「Misskey」をクリックしてください。

お申し込み・お支払いを完了することでサーバーへ自動でインストールされます。
セットアップ準備
Misskeyサーバー情報の確認
Misskeyサーバー接続に必要な情報は「SSH」でVPSにログインするか、「コンソール」から確認できます。
VPSへログインすると下記の画像のような接続に必要な情報が表示されます。
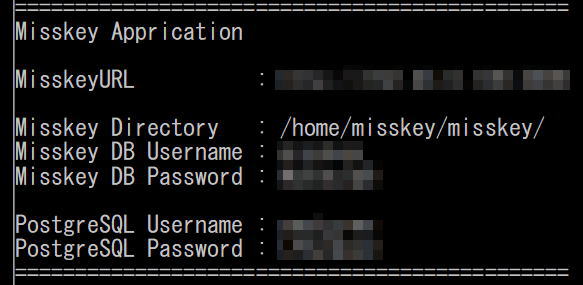
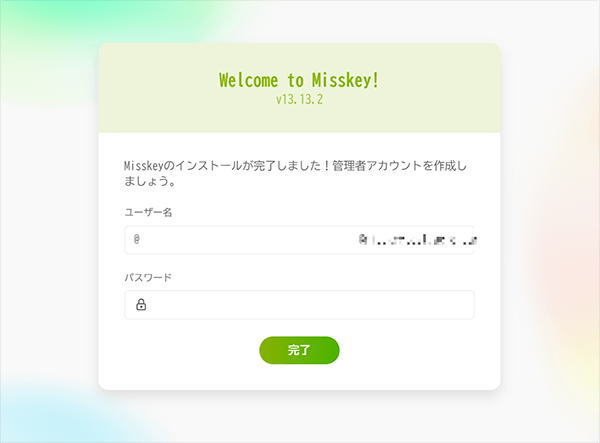
ウェブブラウザより、「http://[IPアドレス]:3000」に接続することで、Misskeyにアクセスできます。
ブラウザより管理用アカウントを作成して完了になります。
SSL/TLS手順
外部に公開されているため、SSL/TLSの設定を推奨します。
一例としてLet’s Encryptを使用します。
独自ドメインはご自身でご用意ください。
「SSH」または「コンソール」よりVPSに接続してください。
※コードのコピーを行うため、SSHでの接続をお勧めします
「example.com」の文字列をご自身のドメインに置き換えて、下記コマンドを実行してください。
certbot certonly –manual -d example.com –preferred-challenges dns
実行後、下記のような画面が表示されます。
認証待ちの画面になりますので、表示後、コンソールに入力を行わないでください。
Saving debug log to /var/log/letsencrypt/letsencrypt.log
Requesting a certificate for example.com
– – – – – – – – – – – – – – – – – – – – – – – – – – – – – – – – – – – – – – – –
Please deploy a DNS TXT record under the name:
_acme-challenge.example.com.
with the following value:
jshfuihOSHIFOE+IFH1231hniof
Before continuing, verify the TXT record has been deployed. Depending on the DNS
provider, this may take some time, from a few seconds to multiple minutes. You can
check if it has finished deploying with aid of online tools, such as the Google
Admin Toolbox: https://toolbox.googleapps.com/apps/dig/#TXT/_acme-challenge.example.com.
Look for one or more bolded line(s) below the line ‘;ANSWER’. It should show the
value(s) you’ve just added.
– – – – – – – – – – – – – – – – – – – – – – – – – – – – – – – – – – – – – – – –
Press Enter to Continue
Successfully received certificate.
Certificate is saved at: /etc/letsencrypt/live/example.com/fullchain.pem
Key is saved at: /etc/letsencrypt/live/example.com/privkey.pem
This certificate expires on 2023-10-04.
These files will be updated when the certificate renews.
表示に従って、お使いのドメインのDNSレコード設定より、TXTレコードの追加を行ってください。
以下は例です。
TXTレコード名:_acme-challenge.example.com.
内容(値):jshfuihOSHIFOE+IFH1231hniof
レコードの追加が完了したのち認証待ちのコンソールでEnterキーを入力することで、認証が行われます。 認証に成功すると下記が表示されます。
—————————————————————————————–
Congratulations! You have successfully enabled https://example.com
—————————————————————————————–
取得したTLS証明書は下記例のフォルダに保存されています。
/etc/letencrypt/live/example.com
「/etc/cron.d/letsencrypt-renew」ファイルを新規作成し、エディタで以下を書き込んで保存してください。
0 0 1 * * root certbot renew –pre-hook “service nginx stop” –post-hook “service nginx start”
以下のコマンドでcronによる定期実行を有効にします。
systemctl restart cron
テキストエディタで以下の「/etc/nginx/conf.d/misskey.conf」ファイルを編集します。
「example.com」の箇所をLet’s Encryptで証明書を発行したドメインに変更してください。
※「example.com」は全部で4箇所あります。
# For WebSocket
map $http_upgrade $connection_upgrade {
default upgrade;
” close;
}
proxy_cache_path /tmp/nginx_cache levels=1:2 keys_zone=cache1:16m max_size=1g inactive=720m use_temp_path=off;
server {
listen 80;
listen [::]:80;
server_name example.com;
# For SSL domain validation
root /var/www/html;
location /.well-known/acme-challenge/ { allow all; }
location /.well-known/pki-validation/ { allow all; }
location / { return 301 https://$server_name$request_uri; }
}
server {
listen 443 ssl http2;
listen [::]:443 ssl http2;
server_name example.com;
ssl_session_timeout 1d;
ssl_session_cache shared:ssl_session_cache:10m;
ssl_session_tickets off;
# To use Let’s Encrypt certificate
ssl_certificate /etc/letsencrypt/live/example.com/fullchain.pem;
ssl_certificate_key /etc/letsencrypt/live/example.com/privkey.pem;
# To use Debian/Ubuntu’s self-signed certificate (For testing or before issuing a certificate)
#ssl_certificate /etc/ssl/certs/ssl-cert-snakeoil.pem;
#ssl_certificate_key /etc/ssl/private/ssl-cert-snakeoil.key;
# SSL protocol settings
ssl_protocols TLSv1.2 TLSv1.3;
ssl_ciphers ECDHE-ECDSA-AES128-GCM-SHA256:ECDHE-RSA-AES128-GCM-SHA256:ECDHE-ECDSA-AES256-GCM-SHA384:ECDHE-RSA-AES256-GCM-SHA384:ECDHE-ECDSA-CHACHA20-POLY1305:ECDHE-RSA-CHACHA20-POLY1305:DHE-RSA-AES128-GCM-SHA256:DHE-RSA-AES256-GCM-SHA384;
ssl_prefer_server_ciphers off;
ssl_stapling on;
ssl_stapling_verify on;
# Change to your upload limit
client_max_body_size 80m;
# Proxy to Node
location / {
proxy_pass http://127.0.0.1:3000;
proxy_set_header Host $host;
proxy_http_version 1.1;
proxy_redirect off;
# If it’s behind another reverse proxy or CDN, remove the following.
proxy_set_header X-Real-IP $remote_addr;
proxy_set_header X-Forwarded-For $proxy_add_x_forwarded_for;
proxy_set_header X-Forwarded-Proto https;
# For WebSocket
proxy_set_header Upgrade $http_upgrade;
proxy_set_header Connection $connection_upgrade;
# Cache settings
proxy_cache cache1;
proxy_cache_lock on;
proxy_cache_use_stale updating;
proxy_force_ranges on;
add_header X-Cache $upstream_cache_status;
}
}
下記のコマンドでNginxを再起動してください。
systemctl restart nginx
以上でお使いのドメインでのアクセスが可能となり、設定完了です。
\XserverならMisskeyテンプレート提供/
【2025年7月10日まで】利用料金30%をキャッシュバック!初期費用無料!月額580円から使える!
まとめ
サーバーの立て方を教えている人
\XserverならMisskeyテンプレート提供/
【2025年7月10日まで】利用料金30%をキャッシュバック!初期費用無料!月額580円から使える!